How to set up an AWS EC2 instance
Amazon Web Service’s EC2 is the workhorse and general purpose computer in the AWS ecosystem. It is affordable (free or very cheap if you keep it scaled to the minimum option), it is easy to set up, and it provides you with a computer located in the cloud. This is a good option if you have content you would like to be accessible everywhere, and especially if you develop solutions you want to be accessible through the Internet.
Here are two examples where a cloud computer may come in handy:
1) If you have ever tried to host services on a local machine through a bread-and-butter Internet Service Provider, you will be delighted to be allocated a persistent IP-address. You can also decide on the ports you want to be accessible or shut bypassing ISP-policy, e.g. blocking outbound port 80 (default HTTP-port).
2) If you have ever used a shared host for hosting websites, you may have been met with software that doesn’t work. This can be because your scripts, plug-ins or other software are using languages not supported by the host. For example many general purpose hosts are not providing support for Python and Ruby. Another problem is libraries and other dependencies. If you want to have access to more advanced photo-editing through e.g. Imagemagick then your fate is in the hand of the provider and what stack/software/libraries/dependencies they wish to provide. You are also stuck with using FTP-client as many shared hosting providers do not grant you SSH access to their servers.
Signing up for AWS access
Setup is fairly easy. First you need to go to the AWS website and sign in or sign up with an Amazon account. As part of the registration Amazon will validate your phone number by calling you with an automatic voice service to give you a verification code, so keep your phone with you as you start the registration process. Follow through the web form for registration a Amazon account, then a
Creating the EC2 Instance

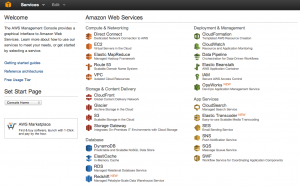
Once registered and validated you should have access to the Management Console. If not you find this by first entering the AWS frontpage, then on the top of the window selecting “My account/Console” then “AWS Management Console”. This should bring up a new view with all the services that AWS provide (don’t be dazzled, there is very much information, but luckily one can survive just using a couple of them). Select the EC2 option in the orange section named “Compute & Networking”. This should bring up another view. Before continuing, go to the top right corner of the screen (to the right for your name) and select the region that is closest to you. (More on regions)

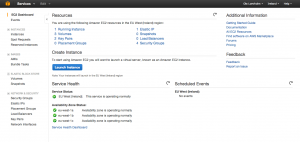
In the EC2-view you can easily set up and administer your instances. One thing to be aware of it that once the instance is created some settings persists with it, and these can only be changed by creating a new instance. This can cause you many hours of extra work if you do many changes to your instance, and it could also make it impossible to access the device (if you loose your encryption keys and passwords.)
There are three things we need to pay attention to at this point: what kind of instance do we want, how should we create the authentication, and how do we deal with persistant storage.
Choosing an AMI
AMI is the abbreviation for Amazon Machine Image. These are the images with the virtual appliances which are used for instanceiate the EC2 (which is basically a virtual machine). You can choose between free public AMIs, commercial images where you have to pay or you can even create an image yourself (the last is out of scope for this post). For this tutorial we are going to use a commonly used image – The Amazon Linux AMI.
From the EC2-view click the new instance button, then choose a classical view for selecting an AMI. As you can see there are several options within Linux and Windows. The ones marked with a star got a free tier if used with the micro instance, so no need to worry about the costs yet.
Creating the keys
To connect to the EC2 you will need SSH-keys which can identify you. There are two ways of creating these keys, either create the key locally and share the public key with the EC2 instance, or you can let Amazon create the keys and send you the public key for the instance. I recommend creating these locally as you then have both the private and the public keys. There seems to be a limit on downloading the keys from Amazon, and this may cause problems if you loose the key. It is also an advantage to have both keys in case you use two or more computers to communicate with your EC2 instance.
To create an SSH-key open your terminal and enter: ssh-keygen -t rsa -C “your@email.example” A tutorial is also provided by GitHub.
Upload this SSH-key when you assign keys in the EC2 setup.
Getting an IP-address
When your instance is up and running you get an access point address where you can find and connect to your instance. I would however recommend that you get an IP-address to this point. Not only is it easier and shorter, it also gives you a way of abstract your virtual machine from the address. Amazon provides you with an Elastic IP, and with this you can change which EC2-instance the IP address should point to. This makes it easy to e.g. start up a new and more powerful instance and then quickly change the IP address to this instance instead of letting the user endure the longer time a virtual reboot would take. At some point you would like to map a DNS address to the Elastic IP so e.g. sub.domain.com or domain.com points to your instance, at this point it is nice to just have to configure the elastic IP and not have to change the DNS record when you want to change instances.
Test your instance
The instance should now be up and running. Now try to connect to your instance using SSH. The login username may change from AMI to AMI, if your AMI is ubuntu the username is usually ubuntu, if you use the standard Amazon Linux AMI the username is ec2-user.
ssh -v ec2-user@123.123.123.12'
Changing the security settings

If you are not able to login it may be that you need to open the firewall to your instance. As you created your instance, you assigned the instance a security settings group.
If you have any problems connecting to a service using a specific port, you should check here to ensure that the traffic is not being blocked at the firewall. For SSH you will need to open port 22.
Creating an alias for easier access
This is not a part of the setup process, but it’s a neat little trick for making access easier. Instad of remembering the whole address in the terminal when you use SSH to connect to your instance, make an alias in the .bashrc or .bash_profile.
If you connect writing ssh -i $HOME/keys/aws.pub 1233.4556.7789.1 then put the string below into your .bash_profile and source this.
alias my_ec2_connect='ssh -v -i $HOME/keys/aws.pub 1233.4556.7789.1'
(Disclaimer to point two: lovholm.net is in fact hosted on a shared host by one.com – WordPress is very convenient to host at providers such as one, since it’s built on ubiquitous web-stack PHP+MySQL, and shared hosts are generally affordable and even easier to set-up than dedicated. One does also have a good admin dashboard from which you also can do some simple rerouting – more on this in a later post)
The image is from Flickr and is provided under a CC-licence. The image is associated to cloud computing and IBM, not Amazon.